Showing posts with label Lightroom. Show all posts

Tuesday, October 8, 2013

Upright and Lens Corrections with Sony NEX 16-50mm in Lightroom and PhotoShop

by Hasan Karagülmez
A some of you probably already know, Lightroom 5 and PhotoShop CC include some pretty cool lens- and perspective-correction options.

In this blogpost I want to show what you can achieve with this in practice, especially with a lens which natively distorts a lot: the Sony 16-50mm f3.5-5.6 powerzoom (modelname: SELP1650), available separately but also as a kitlens with the NEX-6.

In fact here it is, small, but proud as ever on the NEX-6:
The Sony SELP1650 powerzoom mounted on a NEX-6


Why use lens correction?

Well, in the case of the 16-50mm, the benefits of this lens is pretty obvious: it's very small and lightweight.
Certainly size wise it makes a NEX-camera very (jacket-)pocketable, which is 
a big plus for me, as you'll also see my Sony 35mm 1.8 OSS review.

Of course the 16-50mm party-trick is that it's a powerzoom, so it extends when the camera powers up. Rather than a zoom-ring, it has a zoom-switch, which has the added benefit of smooth zooming in video mode as well.


The SELP1650 uses a switch (powerzoom) to actuate the zooming mechanism on this lens.


This is all well and good of course, but there's no such thing as a free lunch and the 16-50 hammers that message home with some pretty impressive (in a bad way) distortion when you shoot RAW.

Well, it happens all the time of course, but modern NEX-camera's like the NEX-6 will automatically correct for this distortion and other lens defects so you will never really see how it behaves (or rather misbehaves) in JPEG mode.


I shoot in RAW 99% of the time, caused it saved my butt just too many times. I guess I'm not good enough to shoot JPEG only, YMMV :)

That does mean that using lens-corrections becomes a part of the workflow, so let's dive in and see what we can do.


How to use lens-corrections in Lightroom

It's actually very easy, in Lightroom you can view the Lens Corrections section just above the Effects section, when you're in Develop-mode.

It looks like this:


Note that these settings are available in PhotoShop as well, if you use Camera RAW.

Anyway, let's take a look at what we can do with the distortion with some sample pictures, shall we?

Oh, just one note, each example consists of three pictures:
  1. As shot distortions
    That is, all distortions as you would see them when shooting RAW, including vignetting and such.
  2. Lens-corrections applied
    Should take care of complex lens distortion (pincushion, barrel), as well as vignetting.
    Note that this will only work if your lens is supported by Lightroom, luckily the SELP1650 is supported.
  3. Upright with the Auto-setting
    Will straighten lines in your photo and correct for perspective.


Example 1: Car and building


Note how the straight lines of the buildings makes straightening this out and correcting for perspective an easy job. Also note how quite a bit of the underside of the picture is chopped off, even though it doesn't really matter in this shot, it's easy to see how it could have. In fact, in another example you'll where this will matter.

Having humongous GIF's results in humongous file sizes, so if you want to view the individual images in higher resolution feel free to look in the Google+ photo-album. 


Example 2: Building


This building is obviously a bit more distant, as it's bigger, but still pretty close, resulting in a need of a focal length of 16mm to capture it.
You can see how the Upright functionality works like a charm, but it also cuts off a bit at the undersides.

Easy to crop out though, or perhaps even fill up with Content-Aware Fill in PhotoShop if you're a bit more adventurous.


Example 3: Church


You'll see the same effect, even as the pictures aren't taken head-on, they are still corrected very well.

However, it also shows you that using the Upright functionality could crop your photo, and you should account for that if you think you're going to need it. 

For example, you can see how in this example that the top-right corner of the building is cut-off.


Wrapping it up

I'll leave it at that for now, you can see two more examples in the Google+ photo-album.

Basically, we can say that using the lens-corrections is definitely something that's really really worth the effort with the 16-50mm kitlens, because of the massive native distortion.

A direct consequence of the lens design I guess, even though it brings important advantages, size being the most prominent one for me.

The Upright functionality in Lightroom (and PhotoShop for that matter), can help give you a new dimension in your photography with minimal effort.


Sure, you *could* have done this all by hand in PhotoShop, but I'd sure hate to have done so - especially considering the simplicity of only having to click twice in Lightroom.

Anyways, happy shooting!

Wednesday, May 15, 2013

Canon 7D, ISO 12800 and Lightroom, in practice

by Hasan Karagülmez


Canon 7D with 24-70mm f2.8 L

Introduction

The Canon 7D.

Loved and loathed probably equally by its (ex-)users, if the great photo-forums are to believed.
Most of the criticisms are in regard to the ISO-performance of the camera, which is often said to be, well, awful.

Well, it *is* a pretty old camera I guess. In fact, I think I've got mine since late 2009 and there have been some amazing camera's coming out in the meantime.

Like a lot of photographers I'm really lusting after a full-frame camera like the 6D (if only it wasn't for the rather pedestrian autofocus...) and the 5D Mark III for their amazing high-ISO performance.
Now, don't get me wrong, the 5D Mark III is really the full-frame camera that I want, but it doesn't exactly come in cheap :)

So, I'll just have to make do with my crippled- crop-sensor camera in the meantime... so why not experiment a bit, right?

ISO 12800 Test

One of the things I wanted to try out is to see how the Canon 7D would hold up at its maximum ISO, which is ISO 12800. Now... for those regularly reading reviews of camera's, this is bound to result in absolute disaster with APS-C camera's - let alone a pretty old one!

Or is it?

Now, I'm not one to peruse really scientific testing of high-ISO, so I won't - besides, I'm far too lazy to do something like that! I just wanted to know what my camera will perform like in practice in such a situation.

For me that means using Adobe Lightroom 4, shooting RAW and, in this case, shooting ISO12800 of course :)

For these test-photo's I've used the Canon 24-70mm 2.8 L lens. It's a very late model and performs stellar as far as I'm concerned. These shots were taken with a polarizer-filter on it, which I believe caused some flare (yes, at night). It's not impossible that I'd be using a polarizer at night, so for me this is still a practical situation.

All shots have been imported in Adobe Lightroom, and then edited with the available controls. That means doing cropping, setting white-balance, doing noise-reduction and such, all within Lightroom.
Don't get me wrong, I have no doubt that PhotoShop is capable of superior results, because of more fine-grained control, but for me that's just not practical as that would take a lot more time - time I don't have. Sometimes good really is just good enough.


Enough talk! Let's see what happened!

Note: all these photo's are available on the webalbum btw! All shots have a max-side of 1980px (i.e., more than enough for web-use).

Shot 1

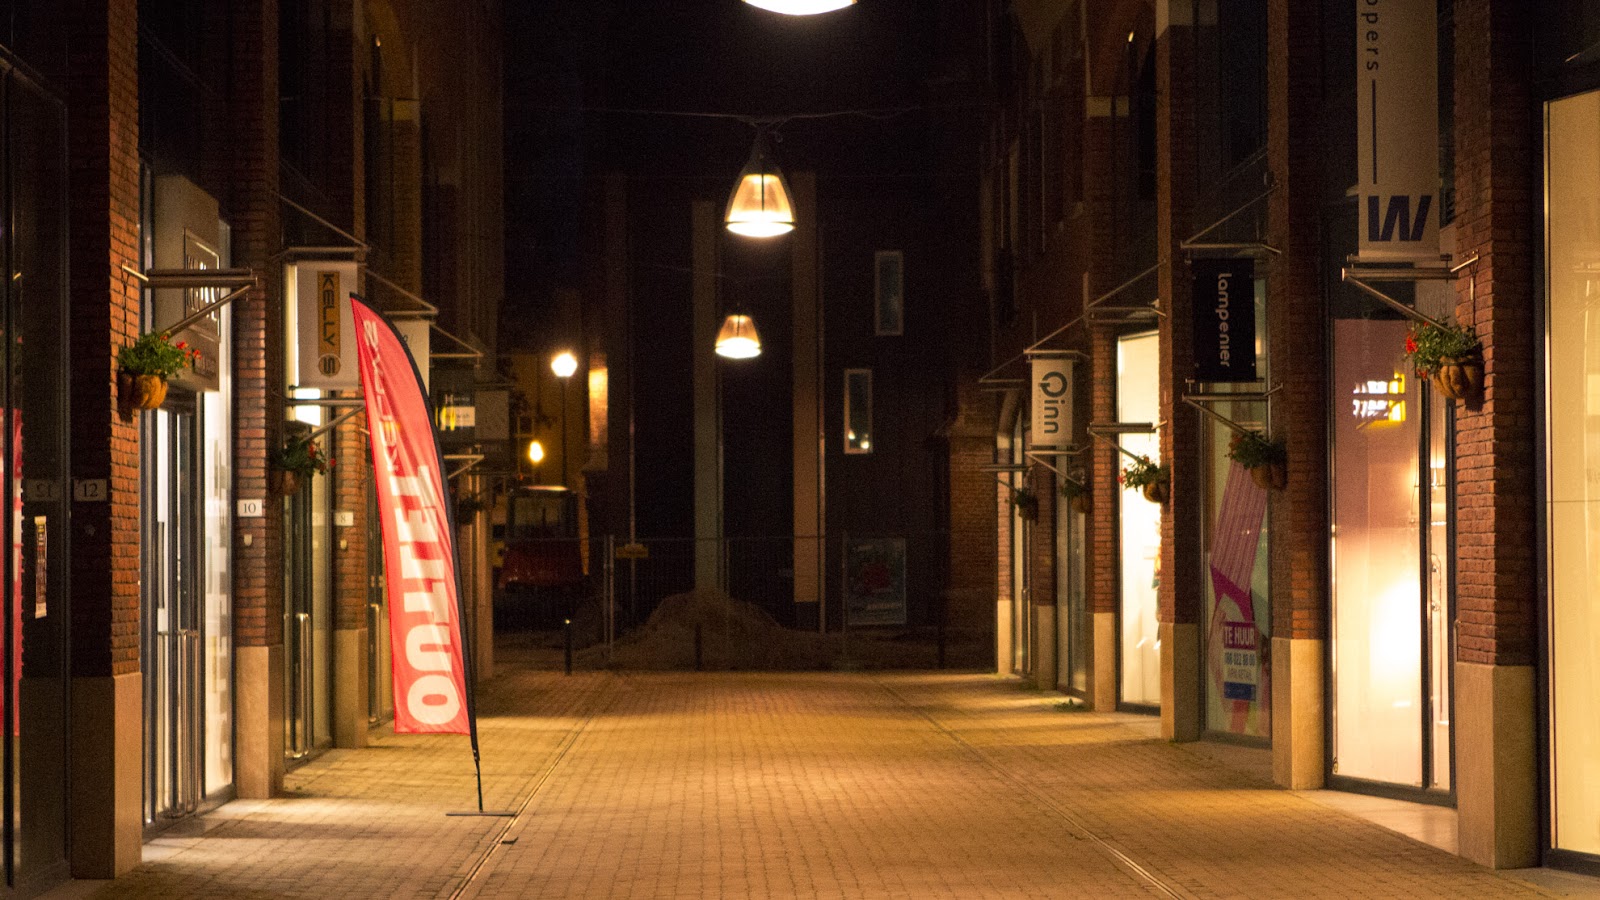
First image, a pretty dark street. The buildings appear pretty dark because of the directional street lighting, aimed at the street:
Canon 7D - ISO12800
Shutter: 1/25th, Aperture: f2.8, handheld ISO12800,  Exposure compensation: +2/3

It's possible to slightly sharpen this across the entire image, but it'll look increasingly worse at higher resolutions. You'll get away with it at these sizes, check it out, same image:
Shutter 1/25th, Aperture: f2.8, ISO12800 - increased clarity and brightness slider in Lightroom

Shot 2


OK, second image, another dark street, more like an alley:
Shutterspeed: 1/6th, Aperture: f2.8, handheld ISO12800. Exposure compensation: +1
Not too bad noise-wise, usable as well. Considering the shutterspeed on this non-stabilized lens, sharpness is actually OK in my book.


Shot 3


Next photo, mostly lit by shoplights, and low-intensity street lighting:
Shutterspeed: 1/30th, Aperture f2.8, handheld ISO12800

Again, not too bad. For ISO12800, this looks pretty OK considering the situation, even at a resolution of 1980x1320


Shot 4, underexposing, then pulling back up in postprocessing


For the next photo, I wanted to test what the result would be if I would underexpose 1 stop (-1EV) and then pull that back up in post-processing.
Let's see what happened:
Shutterspeed: 1/60th, Aperture f2.8, handheld ISO12800

Ouch. Seems like that doesn't work too well...

Let's see what happened when we use the expose-to-the-right principle:
Shutterspeed: 1/8th, Aperture: f2.8, handheld ISO12800. Exposure compensation: +2/3

There's a bit of motion-blur caused by the shutterspeed, but the resulting image is a lot cleaner. Check the H&M sign on the left and the tree-top in the middle - there's a very big difference.
So, same ISO, different exposure -> completely different noise-result.


Shot 5


Another shot in the same street, also using expose-to-the-right principle:

Shutterspeed: 1/30th, Aperture: f2.8, handheld ISO12800. Exposure compensation: +2/3
Focus on the puddle. Pretty good result all-in-all.


Shot 6


OK, walking a bit farther. This is a pretty dark spot as well, street mostly lit by the shops:
Shutterspeed: 1/30th, Aperture: f2.8, 70mm, handheld ISO12800, Exposure compensation: +2/3 

Standing still, but zooming out to 24mm introduces some very dark walls into the shot, and it´s on these walls where you can see that noise is more pronounced.
Perhaps I should have exposed a bit more to get rid of more noise as much as possible:
Shutterspeed: 1/30th, Aperture: f2.8, 24mm, handheld ISO12800, Exposure compensation: +2/3 

Shot 7


So, what happens when we overexpose quite a bit, but then pull back the exposure in Lightroom, 3 stops back in this case:
Shutterspeed: 1/15th, Aperture: f2.8, 70mm, handheld ISO12800, Exposure compensation: +1 1/3 

Nice, that's one of the cleanest results thus far! It seems working like this gives pretty good results!


Shot 8


Let´s try reasonably close detail shot of a flower:
Shutterspeed: 1/15th, Aperture: f2.8, 70mm, handheld ISO12800, Exposure compensation: +1 1/3 


If you click on the image or head over to the webalbum for this shot, you can view it larger. There you'll see that detail is actually pretty well retained, but there's quite a bit of noise in the out-of-focus areas.

That's too bad, but also good in a way: because out-of-focus areas are.. well... out-of-focus anyway, you can apply more noise reduction in those areas.


Shot 9

Let's try and re-use that +1 1/3 exposure compensation for the following shot, hopefully resulting in a better result:

Shutterspeed: 1/20th, Aperture: f2.8, 27mm, handheld ISO12800, Exposure compensation: +1 1/3
Again, a pretty good result.

Shot 10

The disadvantage of adding a lot of exposure compensation consistently at these high-ISO's, is that spots which are already quite well lit get overexposed more easily.
Shooting RAW will help you, but there's a limit to what it can do, such as in this shot where I used the highlight-slider to slightly recover the overexposed areas.

Shutterspeed: 1/20th, Aperture: f2.8, 27mm, handheld ISO12800, Exposure compensation: +1 1/3

Dynamic range is simply less at high-ISO's, limiting your ability to recover highlights and push shadows  so it's just essential to nail the exposure when taking the photo!


OK, enough photo's, let's keep it at that shall we!

There are a couple of more images in the webalbum. Some photo's have more variants, whereby the second one is usually the one which is slightly sharpened.
They tend to look worse on high-resolution but usually pretty ok at smaller resolutions.


Conclusion


In my opinion, the Canon 7D ain't half bad when using these extreme ISO's. Sure, don't expect superb per-pixel sharpness at ISO 12800, but come on... it's ISO12800! On a cropsensor-camera!!

So, some things I've learned, which would work for me in practice:
  • It will *definitely* help to "overexpose", or rather Expose-to-the-Right on the histogram. Underexposing and then pushing another stop at ISO12800 (making it a ISO 25600 equivalent) is not a good idea.
  • Make sure to get as much light on the sensor as possible, and definitely expose-to-the-right and then ideally reduce the exposure a bit in post-processing to get as little noise as possible.
  • Noise will manifest itself distractingly mostly in out-of-focus areas. Too bad for your bokeh, but then again, you *CAN* apply more noise-reduction in getting the out-of-focus areas more clean noise-wise and get away with it.

    Note that color-noise is far more objectionable than luminance-noise! Lightroom doesn't even seem to use luminance noise-reduction at standard.

    Lightroom does have a pretty high Sharpness setting by default though (25), which can, and will, also sharpen noise.
    Lightroom Sharpness and Noise Reduction
    Lightroom Sharpness and Noise Reduction, try using less Sharpening
      Tip: try and use less of sharpening and check the results.
       
    • As a personal favorite, shoot RAW. It makes post-processing a lot easier, changing white-balance without drama for example, as well as noise-reduction settings.
      If shooting JPEG works for you, then that's all fine-and-dandy of course - it'll save a lot of disk-space for sure :)
    • Set your expectations: don't expect amazing quality at this ISO suitable for A3 prints, but if it makes the difference about missing a shot or a having noisy one, I know what I'd choose.

    The best thing for me is that the Canon 7D does NOT exhibit banding noise, even at these extreme ISO's! For those of you having been "lucky" enough to experience that, you'd have noticed that banding noise is a very distracting type of noise, far more than colour- or luminence-noise.

    By the way, from what I understand from reading photo-forums is that apparently there's some copy variation with regard to sensor performance of the Canon 7D. I find this surprising, because I bought the 7D pretty early on, and I'd have expected it to get better along the way, if anything. In other words: your mileage may vary, though I'd love to hear what your experience has been!

    Also: you'd be surprised with what you'll get away with when resizing, don't just delete photo's if your intent is to just post them online. Also, don't go zooming into 100%, no sane person does\should do that...

    By the way, if you want to see how the 7D held up in the very dark Mercedes-Benz Museum, check my other recent blogpost: Visit the Mercedes-Benz Museum in Stuttgart!

    There are more than 150 photographs and where you can see how it handled the low-light. All those shots have been edited in Lightroom as well.


    That's it, don't forget to have fun and happy shooting!


    Related links

    Here are some related links which led me to do my own small test. Some people get some amazing results.
    1. "Visit Mercedes-Benz Museum in Stuttgart!", Hasan Karagülmez,  Used the 7D in this pretty dark museum. If you want to see how it held up, check the following blogpost,
      http://hasankaragulmez.blogspot.com/2013/05/visit-mercedes-benz-museum-in-stuttgart.html
    2. "Post your ISO 12,800+ photos!"-topic on photography-on-the.net,
      http://photography-on-the.net/forum/showthread.php?t=919780&highlight=12800+show
    3. "Mini-Review: 7D vs 5DII High ISO 3200-25600"-topic by Teamspeed,
      photography-on-the.net, http://photography-on-the.net/forum/showthread.php?t=930196
    4. "7D vertical banding - a "regular fault"?"-topic, photography-on-the-net,
      http://photography-on-the.net/forum/showthread.php?t=759283
    5. "Mini-Review: Trying To Get the Most out of the 7D High ISO Images "-topic by Teamspeed, photography-on-the-net, http://photography-on-the.net/forum/showthread.php?t=1079217
    6. "ISO 12800 Canon 7d "-topic on photography-on-the.net, http://photography-on-the.net/forum/showthread.php?t=1248911&highlight=post+12%2C800